


Deploy magento with Gitlab-CI
Magento zero-downtime deployment from Gitlab-CI pipeline
The purpose of this post is to show how one can utilize gitlab-CI to setup a magento zero-downtime deployment. Our deployer gitlab-ci-magento uses gitlab include feature to provide developers with the opportunity to extend their CI/CD pipeline with carefully tailored jobs for magento 2. So although the deployer itself does more than handling a zero-downtime deployment, the later will be our main focus here. Fell free to check out the github repo to learn more about others CI/CD operations, enabled by the deployer, such as testing (integration tests, static tests, etc...), code quality check (phpcs), etc...
The process shown here, can be used to migrate from manual deployment to a zero-downtime one. At the end of the post, is a link to the legacy video summarizing the article, feel free to check it up.
1- SSH and server setup
The first thing to do is to create the ssh certificates that will be used by the gitlab runner (server) in order to execute specific operations on the target server (copy tarball, deploy, linking, etc...). We suppose the server used is linux, so we will be using open-ssl 's keychain generator (ssh-keygen) to create a public and private certificates.
For that make sure you have ssh-keygen available, if not consider installing keychain (apt install keychain).
Then execute the following command line to generate said certificates :
ssh-keygen -t rsa -b 4096 -N '' -f staging_ssh_key Two files will be created :
stagging_ssh_key (the private key)
stagging_ssh_key.pub (the public key)
Next, copy the content of the public key file into the file named authorized_keys in the ssh directory on your staging/production server, create the file if none existent.
The file is found in the ~/.ssh/ directory, ~ corresponding to the home directory of the user which will be used to login from gitlab runner server.
The private key will be feed into gitlab CI/CD settings as a variable, we'll referer to this section several times in the post.
Unless, you're using a self-hosted runner in which case, make sure nonetheless the ip is whitelisted.
2- Setup your local git project
Now we'll create, and setup on the local host the git repository used a VCS during the devs.
If not already done, execute the following commands:
 mkdir myAwesomeShop
 cd myAwesomeShop
 git init .
Now we will set the directory following the required scaffolding:
├── .gitlab-ci.yml       # pipeline config file used by gitlab-ci runner
├── README.md
└── magento # directory where you Magento source files should go (optional)
The magento directory is optional. It is to be set, only if you already have an existing magento project. If that's the case, copy the files in the project root into it (app, composer.json, vendor, etc...). If you have not bootstrap a magento project yet, no worries. You can to so using the following accordingly to the scenario:
Content .gitlab-ci.yml file if you have no magento project yet
include:
  - remote: 'https://raw.githubusercontent.com/MAD-I-T/gitlab-ci-magento/main/.magento-actions-full-template.yml'

install-magento:stage:install:
  variables:
    INPUT_MAGENTO_VERSION: "2.4.5-p1"
    INPUT_OVERRIDE_SETTINGS: 1
    INPUT_NO_PUSH: 0
  extends: .install-magento:stage:install

build:stage:
  extends: .build:stage

deploy-staging:
  extends: .deploy-staging:stage:deploy

cleanup-staging:
  extends: .cleanup-staging:stage:cleanup
Content .gitlab-ci.yml file if you already have a magento project
include:
  - remote: 'https://raw.githubusercontent.com/MAD-I-T/gitlab-ci-magento/main/.magento-actions-full-template.yml'

build:stage:
  extends: .build:stage

deploy-staging:
  extends: .deploy-staging:stage:deploy

cleanup-staging:
  extends: .cleanup-staging:stage:cleanup
Now that the local git project is setup, we shall move on to the gitlab instance, to setup the repository.
3- Setup your gitlab repository
Create the gitlab repository and follow the instruction to link it to the previously created git local project.
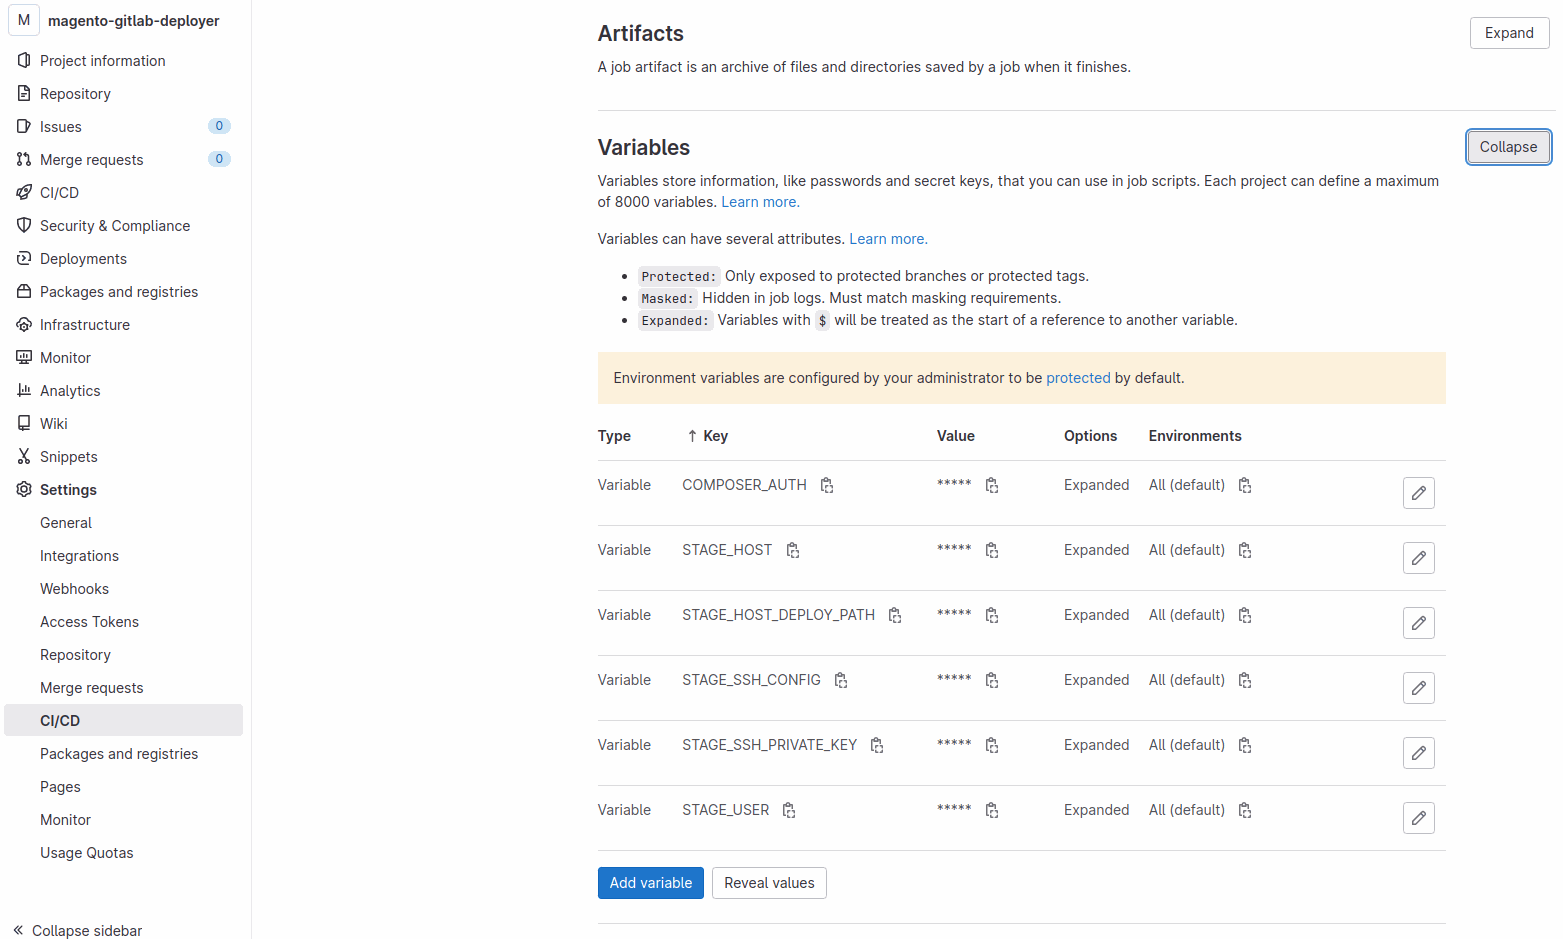
Now that the project is created, time to create the mandatory variables used by gitlab-ci to bootstrap your pipeline.
For that, go to Settings>CI/CD>Variables of your repo and create and fill the following variables accordingly:
COMPOSER_AUTH = {"http-basic":{"repo.magento.com": {"username": "xxxxxxxxxxxxxx", "password": "xxxxxxxxxxxxxx"}}}STAGE_HOST = my-awesome-shop.fr #domain name or ip STAGE_USER = ubuntu #The name of the ssh user on the deployment server STAGE_HOST_DEPLOY_PATH = The path to the root dir on the satging or prod server (i.e /var/www/myawesomeshop/) STAGE_SSH_PRIVATE_KEY = The content of the ssh private key create in the beginning of the post e.g ssh_staging_key STAGE_SSH_CONFIG = Host staging # this must be staging or production according to your deployment type User ubuntu # the staging/prod username bound to the ssh connecting IdentityFile ~/.ssh/id_rsa # Do not modified this unless you know what you're doing HostName my-awesome-shop.fr # the hostname or ip addr of your deployment server prod or staging Port 22 # The ssh often 22 to be modified accordingly to the server setup
Gilab-CI variables settings
The following step is needed only if you plan to use the tool to download and install the magento code for you (e.g: first gitlab-ci.yml sample). After downloading the magento source the gitlab runner will need to push it to your repo. So we'll generate a deploy key using the ssh files create at the beginning.
Got to Settings>Repository>Deploy keys an create a deploy key by copying the generated (section 1) ssh public key content in the key field and give whatever title. Do not forget to check the "Grant write permissions to this key" field, and that's it we're almost done.
Gitlab-CI deploy keys settings

The remaining setup is recommended but optional, indeed, to avoid failure during the first deployment. You should create theses dirs and files:
Create $HOST_DEPLOY_PATH/shared/magento/app/etc/ directory (i.e /var/www/myawsomeshop/shared/magento/app/etc/
Place your configured env.php in the directory
And we set!
Also when configuring you http server (apache, nginx etc...), the ROOT directory should be $HOST_DEPLOY_PATH/current/magento/ .
4- Build and deploy !
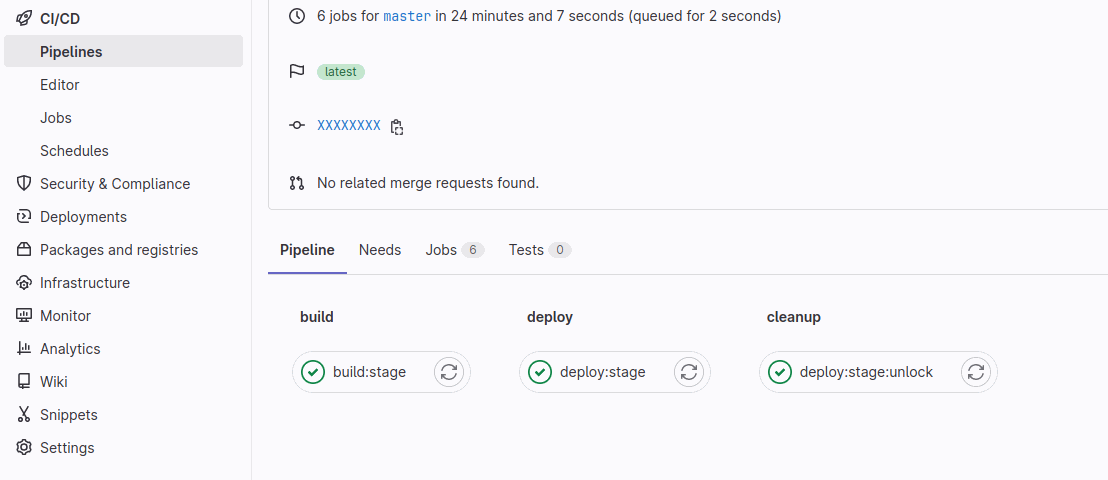
Now you can push your repository to gitlab, the pipeline will automatically start building and deploying your magento to prod. Make sure your magento, database and env.php are setup accordingly. Still in any case, if the deployment fails the cleanup job, will be launched to clean things up.
In a successful scenario, you should see something similar to the following:
Successful build and deploy of magento
Also we do offer hands on paid support, if you're having trouble setting up your CI/CD, please checkout the offer details here.
Side note: Please feel free also check our magento-actions it has a similar purpose than the gitlab deployer but is tailored for github actions. The setup article can be found here.